First, choose whether to apply an Audio Filter or Audio Transition .
Filters only affect only the selected or created frames. The filters provide effects which range from doing nothing, silencing, fading, dubbing, or mixing the audio.
Transitions take two sets of frames as input (referred to as A and B frames) and provide functionality to merge them together in some way. The only built-in transition is Cross Fade .
![[Important]](images/important.png) |
Important |
|---|---|
The B frames of the audio transition are driven by the Video Transition selection. |
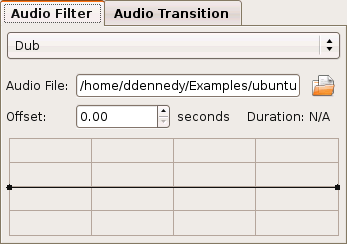
Dub replaces the original audio with that from another source specified by Audio File . Click the folder icon to open a file chooser dialog to help locate a file. Enter a value for Offset to start from the external source at a position other than the beginning.
The line graph widget is a gain envelope . It lets you adjust the gain level of the audio. The horizontal axis is time, and the vertical axis is the gain. For example, you could fade from silence in the same step as performing the dub. Click anywhere on the line between the two dots to add a new dot--or control handle. Click and drag a dot to adjust. The middle position on the vertical axis is 100% gain, or the original volume level. You risk introducing clipping when you go above the mid-level, but it can be useful for soft sources. To remove a dot, drag it outside of the gain envelope widget.
![[Tip]](images/tip.png) |
Tip |
|---|---|
To make it easy to adjust the overall gain level, remove one of the dots, leaving just one. |
The duration of the external audio source is truncated by the duration of the effect. Likewise, the duration of the audio effect is truncated by the duration of the audio source. Because time is not depicted on the horizontal axis, it can be difficult to adjust the gain envelope--use the Section 9.4, “Preview” . While the preview might not give a perfect prediction of the results, it might help.
Kino only natively dubs from WAV files. However, if you have installed ffmpeg, it attempts to use whatever your ffmpeg can open including possibly MP3, Ogg Vorbis, AAC, and AC-3.
![[Note]](images/note.png) |
Note |
|---|---|
When not using WAV and starting preview from a position other than the beginning of the effect, you may notice a pause before playback. Kino must read from the ffmpeg pipe until it reaches the starting point of the preview. |
Fade In starts out by reducing the volume to silence and then it gradually transitions to the original volume. The gain follows a simple, linear ramp.
Fade Out starts out at the original volume and gradually reduces the volume to silence. The gain follows a downward linear ramp.
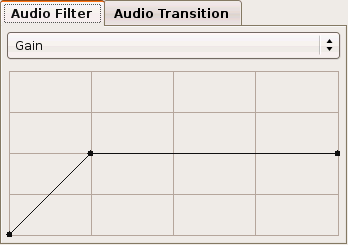
Gain adjusts the audio volume over time.
The line graph widget is a gain envelope . It lets you adjust the gain level of the audio. The horizontal axis is time, and the vertical axis is the gain. For example, you could fade from silence in the same step as performing the dub. Click anywhere on the line between the two dots to add a new dot--or control handle. Click and drag a dot to adjust. The middle position on the vertical axis is 100% gain, or the original volume level. You risk introducing clipping when you go above the mid-level, but it can be useful for soft sources. To remove a dot, drag it outside of the gain envelope widget.
|
Tip |
|---|---|
To make it easy to adjust the overall gain level, remove one of the dots, leaving just one. |
Because time is not depicted on the horizontal axis, it can be difficult to adjust the gain envelope--use the Section 9.4, “Preview” . While the preview might not give a perfect prediction of the results, it might help.
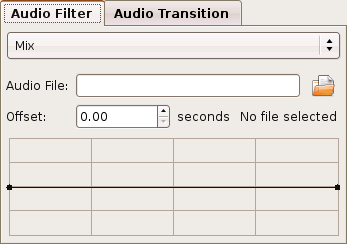
Mix combines the original audio with that from another source specified by Audio File . Click the folder icon to open a file chooser dialog to help locate a file. Enter a value for Offset to start from the external source at a position other than the beginning.
The line graph widget is a gain envelope . It lets you adjust the mix level of the external audio source. The horizontal axis is time, and the vertical axis is the gain. The higher the level, the greater the external audio source level and the less of the original audio. Click anywhere on the line between the two dots to add a new dot--or control handle. Click and drag a dot to adjust. The middle position on the vertical axis evenly mixes the original and external audio; however, due to differences in the recording level of each audio source, one source may still sound louder than the other.
|
Tip |
|---|---|
To make it easy to adjust the overall mix level, remove one of the dots, leaving just one. |
The duration of the external audio source is truncated by the duration of the effect. Likewise, the duration of the audio effect is truncated by the duration of the audio source. Because time is not depicted on the horizontal axis, it can be difficult to adjust the gain envelope--use the Section 9.4, “Preview” . While the preview might not give a perfect prediction of the results, it might help.
Kino only natively mixes from WAV files. However, if you have installed ffmpeg, it attempts to use whatever your ffmpeg can open including possibly MP3, Ogg Vorbis, AAC, and AC-3.
|
Note |
|---|---|
When not using WAV and starting preview from a position other than the beginning of the effect, you may notice a pause before playback. Kino must read from the ffmpeg pipe until it reaches the starting point of the preview. |
Crossfade fades clip A to silence while clip B fades from silence. This provides a nice, smooth cross-over effect. Actually, this is not strictly a crossfade since you have full control over the gain of each clip's audio; however, the intention of this is give you more control over the shape of the crossfade or to compensate for something in the audio track of the clips.
The line graph widgets are gain envelope controls. The horizontal axis is time, and the vertical axis is the gain. Click anywhere on the line between the two dots to add a new dot--or control handle. Click and drag a dot to adjust. The middle position on the vertical axis is 100% gain, or the original volume level. To remove a dot, drag it outside of the gain envelope widget.
|
Tip |
|---|---|
A common variant of the linear ramps, is to create a sigmoid-like B Curve and its mirror image for the A Curve . |