| 3.4. Gradients dialog | ||
|---|---|---|
 |
3. Image content related dialogs |  |
| 3.4. Gradients dialog | ||
|---|---|---|
| |
3. Image content related dialogs | |
The Gradients dialog offers a gradient palette which is used to select a gradient -- a set of colors arranged in a linear scale -- for use with the Blend tool and numerous other operations. It also gives you access to several functions for manipulating gradients. You can select a gradient by clicking on it in the list: it will then be shown in the Brush/Pattern/Gradient area of the Toolbox. A few dozen nice gradients come pre-installed with GIMP. You can create more using the Gradient Editor. General information about gradients and how they are used in GIMP can be found in the Gradients section.
The first four gradients are particular: they reproduce the gradient between Foreground and background colors of toolbox in different ways.
The Gradients dialog is a dockable dialog; see the section on Dialogs and Docking for help on manipulating it. It can be activated in several ways:
From the Toolbox menu: → → .
From the Toolbox menu: → → → . This gives you a dock containing three dialogs, with the Gradients dialog one of them.
From the Toolbox, by clicking on the current gradient in the Brush/Pattern/Gradient area.
From an image menu: → .
From the Tab menu in any dockable dialog: → .
From the image by using the Ctrl+G shortcut.
The most basic, and most commonly used, operation with the dialog is simply to click on one of the gradients in the scrollable list, in order to make it GIMP's current gradient, which will then be used by any operation that involves a gradient.
If you double-click on a gradient, you open the Gradient Editor where you will be able to edit its name. Note, however, that you are only allowed to change the names of gradients that you have created yourself, not the ones that come pre-installed with GIMP. If you try to rename a pre-installed gradient, you will be able to edit the name, but as soon as you hit return or click somewhere else, the name will revert to its original value. It is a general rule that you cannot alter the resources that GIMP pre-installs for you: brushes, patterns, gradients, etc; only ones that you create yourself.
In the Tab menu, you can choose between and . In Grid mode, the gradients are laid out in a rectangular array. They look quite dazzling when viewed this way, but it is not very easy to pick the one you want, because of visual interference from the neighboring ones. In List mode, the more usable default, the gradients are lined up vertically, with each row showing its name.
![[Note]](../images/note.png)
|
Note |
|---|---|
|
In the Tab menu, the option Preview Size allows you to adapt the size of gradient previews to your liking. |
The buttons at the bottom of the dialog allow you to operate on gradients in several ways:
This button activates the Gradient Editor.
This creates a new gradient, initialized as a simple grayscale,
and activates the Gradient Editor so that you can alter it.
Gradients that you create are automatically saved in the
gradients
folder of your personal GIMP directory, from which they are
automatically loaded when GIMP starts. (You can change this
folder, or add new ones, using the Preferences dialog.)
This creates a copy of the currently selected gradient. You will be able to edit the copy even if you cannot edit the original.
This removes all traces of the gradient, if you have permission to do so. It asks for confirmation before doing anything.
If you add gradients to your personal
gradients
folder by some means other than this dialog, this button causes
the list to be reloaded, so that the new entries will be
available.
The functions performed by these buttons can also be accessed from the dialog pop-up menu, activated by right-clicking anywhere in the gradient list. The menu also gives you one additional function:
The Gradient Editor allows you to edit the colors in a gradient. It can only be used on gradients you have created yourself (or on a copy of a system gradient), not on system gradients that come pre-installed with GIMP. This is a sophisticated tool that may take a bit of effort to understand. The concept behind it is that a gradient can be decomposed into a series of adjoining segments, with each segment consisting of a smooth transition from the color on the left edge to the color on the right edge. The Gradient Editor allows you to pack together any number of segments, with any colors you want for the left and right edges of each segment, and with several options for the shape of the transition from left to right.
You can activate the Gradient Editor in several ways:
By double-clicking on the gradient stripe in the Gradient dialog.
From the context menu you get by right clicking on the selected gradient name.
By clicking on the button in the Gradient Dialog.
From the Gradient Menu you get by clicking on the small triangle representing the Tab Menu in the Gradient Dialog.
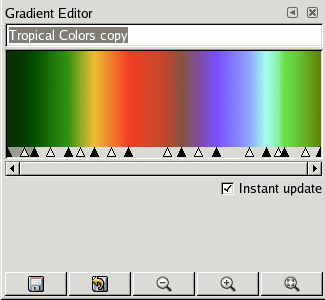
In the name area, you have the tab menu button (the small triangle) which opens a menu where you find the Gradient Editor Menu.
Below the name, you see the current result of your work if the Instant update option is checked; else, changes will appear only when you release the mouse button.
If you simply move the mouse pointer on this display, it works somewhat as a color-picker. Values of the pointed pixel are displayed in a rather odd way. Position is a number given to 3 decimal places, from 0.000 on the left to 1.000 on the right of the whole gradient. RGB, HSV, Intensity and Opacity are also a ratio...
If you click-n-drag on display, then only position and RGB data are displayed. But they are passed on to the Foreground color in Toolbox and to the four first gradients of the palette.
Below the gradient display, you see a set of black and white triangles lined up in row. A segment is the space between two consecutive black triangles. Inside each segment is a white triangle, which is used to “warp” the colors in the segment, in the same way that the middle slider in the Levels tool warps the colors there. You can select a segment by clicking between the two black triangles that define it. You can select a range of segments by shift-clicking on them. The selected range always consists of a set of consecutive segments, so if you skip over any when shift-clicking, they will be included automatically. If “Instant update” is checked, the display is updated immediately after any slider movement; if it is unchecked, updates only occur when you release the mouse button.
You can move sliders, segments and selections. If you simply click-n-drag a slider, you only move the corresponding transition. By Click-n-drag on a segment you can move this segment up to the next triangle. By Shift+click-n-drag on a segment/selection, you can move this segment/selection and compress/ dilate next segments.
Below the sliders is a scrollbar. This only comes into play if you zoom in using the buttons at the bottom.
Below the sliders is an area that initially is blank, but depending on your actions, helpful hints or feedback messages may appear here.
At the bottom of the dialog appear five buttons:
Clicking this button causes the gradient, in its current
state, to be saved in your personal
gradients
folder, so that it will automatically be loaded the next
time you start GIMP.
Clicking this button undoes all of your editing. (However, at the time this is being written, this function is not yet implemented.)
Clicking this button shrinks the gradient display horizontally.
Clicking this button expands the gradient display horizontally. You can then use the scrollbar to pan the display left or right.
Clicking this button resizes the display horizontally so that it fits precisely into the window.
You can access the Gradient Editor menu either by right-clicking on the gradient display, or by choosing the top item in the dialog's tab menu. The menu allows you to set the left and right edge colors for each segment, and control the transition from one color to the other.
The following commands can be found in the menu:
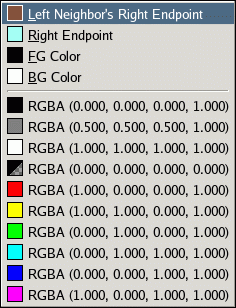
These options allow you to choose a color for the respective endpoint using a Color Editor.
These options give you a number of alternative ways of assigning colors to the endpoints. From the submenu you can choose (assuming we're dealing with the left endpoint):
This choice will cause the color of the right endpoint of the segment neighboring on the left to be assigned to the left endpoint of the selected range.
This choice will cause the color of the right endpoint of the selected range to be assigned to the left endpoint.
These choice cause GIMP's current foreground or background color, as shown in the Toolbox, to be assigned to the endpoint.
At the bottom of the menu are 10 "memory slots". You can assign colors to them using the "Save" menu option described below. If you choose one of the slots, the color in it will be assigned to the endpoint.
These options cause the color of the endpoint in question to be assigned to the "memory slot" selected from the submenu.
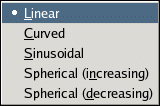
This option determines the course of the transition from one endpoint of the range (segment or selection) to the other, by fitting the specified type of function to the endpoints and midpoint of the range:
Default option. Color varies linearly from one endpoint of the range to the other.
Gradient varies more quickly on ends of the range than on its middle.
The opposite of the curved type. Gradients varies more quickly on center of the range than on its ends.
Gradient varies more quickly on the left of the range than on its right.
Gradient varies more quickly on the right than on the left.
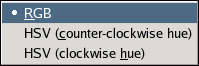
This option gives you additional control of the type of transition from one endpoint to the other: as a line either in RGB space or in HSV space.
This option does a right-to-left flip of the selected range (segment or selection), flipping all colors and endpoint locations.
This option splits the selected range (segment or selection) into two parts, each of which is a perfect compressed copy of the original range.
This option splits each segment in the selected range in into two segments, splitting at the location of the white triangle.
This option is similar to the previous one, but it splits each segment halfway between the endpoints, instead of at the white triangle.
This option deletes all segments in the selected range, (segment or selection) replacing them with a single black triangle at the center, and enlarging the segments on both sides to fill the void.
This option moves the white triangle for each segment in the selected range to a point halfway between the neighboring black triangles.
This option causes the black and white triangles in the selected range to be shifted so that the distances from one to the next are all equal.
This option is only available if more than one segment is selected. It causes the colors at interior endpoints in the range to be averaged, so that the transition from each segment to the next is smooth.
This option does the same thing as the previous option, but with opacity instead of color.
![[Caution]](../images/caution.png)
|
Caution |
|---|---|
|
There is no "undo" available within the Gradient Editor, so be careful! |